The FortiGates don't have any backup automation abilities out of the box. Generally you'd use a FortiManager for the config, backup and control of multiple FortiGates.
I've recently setup a lab with several FortiGates for testing and wanted a simple way of backing up the configs every day so I could always revert back to a previous day quickly.
You could just backup the config before making changes, but I wanted to automate this process. Below is a quick and dirty script to automate the config backup.
A few notes to begin with; this script requires a read only user to be created on each FortiGate that have the same password. These passwords are stored in the script itself; so while it never gets transmitted in cleartext over the link, be aware that it is stored in the file. Since this is a lab and it's a readonly account I'm not too fussed. Another thing to note is that the strict host check for the SSH keys has been disabled (so you don't get a confirmation request for new IP addresses). There is a more secure way to do this without using passwords but ssh keys which I may create a blog on at a latter date.
The only dependency is that the script requires sshpass to be installed.
My guide goes through setting this all up on a Debian based Linux system (like Mint or Ubuntu). It should be fine to work on other distributions with few command changes.
Steps involved:
1. Install sshpass
2. Enable SCP and SSH on FortiGates
3. Create a read only profile
4. Create a read only user
5. Create script and edit the code
6. Make script executable
7. Test the script
8. Configure crond to automatically run the script
sudo apt-get install -y sshpass
config system interface
edit port6
set allowaccess ssh
end
Then type the below to enable SCP:
config system global
set admin-scp enable
end
Give your profile a name and select the 'Read Only' tick-box to ensure all access control options change to read only. Click 'Ok' to save.

Type in the users login name, give a password and select the read-only profile we created in step 3. Click 'Ok' to save.

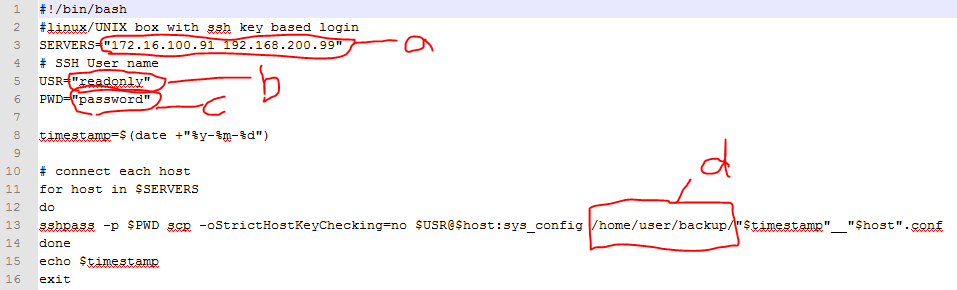
a) SERVERS: Replace the IP addresses here with the IP addresses (and/or hostnames) of the FortiGate units you want to connect to (and that you've enabled SSH/SCP for). Separate server addresses with a space.
b) USR: Replace with your read-only username we created in step 4.
c) PWD: Replace with your read-only password we created in step 4.
d) This is the directory that the file will be saved in. Ensure that this directory exists and the user that runs the script has write access to it.
The full script is below:
Once this is done save the file with the .sh extension (for this exmple I use fortinet-backup.sh).
chmod u+x fortinet-backup.sh
allan@amouawad-mint ~/backup $ ./fortinet-backup.sh
Backup completed!
allan@amouawad-mint ~/backup $ ls
14-01-10_172.16.100.91.conf 14-01-10_192.168.200.99.conf fortinet-backup.sh
If you're unsure howto use cron I'd suggest you search for a few examples. The key here is to add a line at the end of the file that will determine the frequency that you wish the script to run, and the scripts name/location.
For example I've used the following:
0 1 * * * /home/user/backup/fortinet-backup.sh
This will run the script located in /home/user/backup/fortinet-backup.sh once everyday at 1am.

Save the file and you should be done!
I've recently setup a lab with several FortiGates for testing and wanted a simple way of backing up the configs every day so I could always revert back to a previous day quickly.
You could just backup the config before making changes, but I wanted to automate this process. Below is a quick and dirty script to automate the config backup.
A few notes to begin with; this script requires a read only user to be created on each FortiGate that have the same password. These passwords are stored in the script itself; so while it never gets transmitted in cleartext over the link, be aware that it is stored in the file. Since this is a lab and it's a readonly account I'm not too fussed. Another thing to note is that the strict host check for the SSH keys has been disabled (so you don't get a confirmation request for new IP addresses). There is a more secure way to do this without using passwords but ssh keys which I may create a blog on at a latter date.
The only dependency is that the script requires sshpass to be installed.
My guide goes through setting this all up on a Debian based Linux system (like Mint or Ubuntu). It should be fine to work on other distributions with few command changes.
Steps involved:
1. Install sshpass
2. Enable SCP and SSH on FortiGates
3. Create a read only profile
4. Create a read only user
5. Create script and edit the code
6. Make script executable
7. Test the script
8. Configure crond to automatically run the script
1. Install sshpass
From your linux terminal type the following to install sshpass:sudo apt-get install -y sshpass
2. Enable SCP and SSH on the FortiGate
For this example we'll configure port6 with SSH. Login to the CLI of your FortiGate and config the following:config system interface
edit port6
set allowaccess ssh
end
Then type the below to enable SCP:
config system global
set admin-scp enable
end
3. Create a read only profile
In the webgui goto System > Admin > Admin Profiles and click 'Create New'.Give your profile a name and select the 'Read Only' tick-box to ensure all access control options change to read only. Click 'Ok' to save.
4. Create a read only user
Goto System > Admin > Administrators and click 'Create New'.Type in the users login name, give a password and select the read-only profile we created in step 3. Click 'Ok' to save.
5. Create script and edit the code
Copy the script below in a text editor and then change the following settings:a) SERVERS: Replace the IP addresses here with the IP addresses (and/or hostnames) of the FortiGate units you want to connect to (and that you've enabled SSH/SCP for). Separate server addresses with a space.
b) USR: Replace with your read-only username we created in step 4.
c) PWD: Replace with your read-only password we created in step 4.
d) This is the directory that the file will be saved in. Ensure that this directory exists and the user that runs the script has write access to it.
The full script is below:
#!/bin/bash
#linux/UNIX
SERVERS="172.16.100.91 192.168.200.99"
# SSH User name
USR="readonly"
PWD="password"

timestamp=$(date +"%y-%m-%d")

# connect each host
for host in $SERVERS
do
sshpass -p $PWD scp -oStrictHostKeyChecking=no $USR@$host:sys_config /home/user/backup/"$timestamp"_"$host".conf
done
echo 'Backup Completed!'
exit
Once this is done save the file with the .sh extension (for this exmple I use fortinet-backup.sh).
6. Make script executable
To be able to run the script you'll need to make it executable.chmod u+x fortinet-backup.sh
7. Test the script
Now the fun part, to test the script! Goto the directory that the script is located in an run it with the following ./fortinet-backup.sh. After a while you should get the 'Backup completed!' message. If you do an ls you should now see the configs. The naming scheme is the date followed by the IP or domain name of the firewall.allan@amouawad-mint ~/backup $ ./fortinet-backup.sh
Backup completed!
allan@amouawad-mint ~/backup $ ls
14-01-10_172.16.100.91.conf 14-01-10_192.168.200.99.conf fortinet-backup.sh
8. Configure crond to automatically run the script
Now this is done and confirmed working, we want to get the script to run on a schedule. For this we need to configure cron with the following command: crontab -e.If you're unsure howto use cron I'd suggest you search for a few examples. The key here is to add a line at the end of the file that will determine the frequency that you wish the script to run, and the scripts name/location.
For example I've used the following:
0 1 * * * /home/user/backup/fortinet-backup.sh
This will run the script located in /home/user/backup/fortinet-backup.sh once everyday at 1am.
Save the file and you should be done!
15 comments:
Very Nice. Thanks!
Nice one!!!
thanks man :)
maybe you have same but from windows ?
thanks
This is great. Saves hours a month
Спасибо! Все работает.
I cant scp
Sending command: scp -v -f — sys_config
debug1: client_input_channel_req: channel 0 rtype exit-status reply 0
Sink: 501-Permission Denied
i checked that scp is enabled .
some one said someting about versoins of ssh?
any one any ideas?
For windows, you can try:
1 a batch script with this syntax:
@echo off
winscp /script=d:\backup\fg001.txt
then, the script that's called from the batch script.
option batch on
option confirm off
open user@NetScanner
option transfer binary
get sys-config
close
exit
I don't know if this will work on the fg, but I've used it to copy files from a Ubuntu server
I'm having the same issue did you ever figure out the problem?
Are you guys sure that scp has been enabled?
If I disable scp and try to run the command I get the same 501-Permission Denied error:
### SCP disabled ###
allan@sql:~$ scp admin@192.168.100.1:sys_config /home/imadmin/test2.conf
admin@192.168.100.1's password:
501-Permission Denied
####################
### SCP enabled ###
allan@sql:~$ scp admin@192.168.100.1:sys_config /home/imadmin/test.conf
The authenticity of host '192.168.100.1 (192.168.100.1)' can't be established.
DSA key fingerprint is a4:ac:0f:12:9d:43:0f:6a:02:1e:de:2f:df:1b:8a:7f.
Are you sure you want to continue connecting (yes/no)? yes
Warning: Permanently added '192.168.100.1' (DSA) to the list of known hosts.
admin@192.168.100.1's password:
sys_config 100% 212KB 211.9KB/s 00:01
####################
If you run the scp command as per above, does it give you the same errors?
:) the script is working but if you try to restore the backup configuration file you will experience downtime :)))))))))
I also get permission denied, but when trying to restore the config. Backup/download works.
$ scp fgt-config admin@10.1.1.1:fgt_restore_config
admin@10.1.1.1's password:
501-Permission Denied
SCP is enabled and I can get the config file FROM FG.
# show full-configuration | grep admin-scp
set admin-scp enable
$ scp admin@10.1.1.1:fgt-config .
admin@10.1.1.1's password:
fgt-config
Morning, i made all the instructions described in this article.
When i run my script at the end, i receive the message "backup completed" but i don't see the file displayed on the directory that i have chossen.
you need to run this command in the fortigate console:
config system global
set admin-scp enable
end
many thanks !!
Here my scp version (with auth by key)
scp userbackup@$host:sys_config ~/fortigate/"$host"_"$timestamp".conf
Post a Comment